Implement an External Task Worker
Goal
Implement the missing notification service with an external task worker. You can think of an external task worker as an asynchronous service call, similar to an asynchronous user task interaction instead of your typical synchronous service task implementation. Use the camunda-external-task-client-java to do this.
Short description
- Update your process and change the rejection notification task in the process to an external service task.
- Update your project to include Camunda REST API dependency in you pom.xml. This will allow external applications to access Camunda via REST API.
- Create a new project in your IDE make sure to add the Java compiler version 1.8 to maven properties
- Add the following dependencies to the newly created project: camunda-external-task-client-java and the logback-framework to the pom.xml
- Create a java client in the new project that will subscribe to the topic and log some notification.
Detailed steps
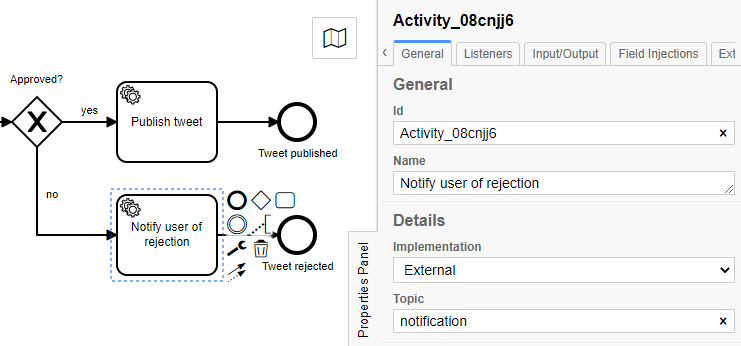
In Modeler change the Notify user of rejection task from a Script Task to a Service Task using the wrench icon in Context Pad. Update the Implementation in the Service Task to External and enter notification for a Topic.
Run the JUnit tests. Did you get the assertion error on the
testTweetRejected?Add the external task handling to the test. Assert that the process instance is waiting at the external task and that the task has the expected topic. Then complete the task to continue the process execution. You can add
  assertThat(processInstance)
     .isWaitingAt(findId("Notify user of rejection"))
     .externalTask()
     .hasTopicName("notification");
  complete(externalTask());
to the test method after the process instance is created.
Be sure that the
camunda-bpm-spring-boot-starter-restdependency is included in the pom.xml. This dependency is the base to enable a worker to communicate with the process engine.Create a new simple maven project in your IDE without archetype selection. You may want to create the project in a new workspace and in a new window as well. We’ll just be creating a simple java client hence no need for an archetype.
In the new project add the Java compiler version 1.8 as
in the pom.xml. <properties> <maven.compiler.source>1.8</maven.compiler.source> <maven.compiler.target>1.8</maven.compiler.target> <version.java>1.8</version.java> </properties>Just below the
entry add the camunda-external-task-client-java and logback-classic artifacts to the pom.xml: <dependencies> <dependency> <groupId>org.camunda.bpm</groupId> <artifactId>camunda-external-task-client</artifactId> <version>7.16.0</version> </dependency> <dependency> <groupId>ch.qos.logback</groupId> <artifactId>logback-classic</artifactId> <version>1.2.3</version> </dependency> <dependency> <groupId>com.sun.xml.bind</groupId> <artifactId>jaxb-impl</artifactId> <version>2.2.4</version> </dependency> </dependencies>In
src/main/javacreate a class with a staticmainmethod with the following imports:import org.camunda.bpm.client.ExternalTaskClient; import org.camunda.bpm.client.topic.TopicSubscriptionBuilder; public class NotificationWorker { public static void main(String[] args) { } }Next, add code in the
mainmethod to bootstrap the client. You’ll create a client and provide parameters to enable its functions. You’ll need to provide a base url to point to where to listen for tasks (via REST). The long polling (asynceResponseTimeout) interval is set in milliseconds and determines the interval the client uses to poll for new tasks. A lock duration (lockDuration) for the task is also set in milliseconds. A lock is similar to a claim for a user task, it ensures that nothing else works on the task. A lock duration is set to make sure tasks are not locked up forever in case the client goes down after locking a task for some reason. The maximum number of tasks (maxTasks) is also set and should reflect the number of tasks to be completed at each polling interval. Be awarew that the client will work on all fetched tasks sequentially.// bootstrap the client ExternalTaskClient client = ExternalTaskClient.create() .baseUrl("http://localhost:8080/engine-rest") .asyncResponseTimeout(20000) .lockDuration(10000) .maxTasks(1) .build();Now that the client has been created, we’ll need to subscribe it to the
notificationtopic that you set on the Notify user of rejection task earlier:// subscribe to the topic TopicSubscriptionBuilder subscriptionBuilder = client .subscribe("notification");Next, add a handler that will execute for each task that is brought back. A job is created on the topic when a process instance reaches the Notify user of rejection task. The handler in the external client can get data from the instance context as well as set data within the context. The handler with then either complete the task, fail the task, or release the lock on the task. For now, let’s just complete the task and that is accomplished using the
subscriptionBuilderobject. We’ll send back a timestamp to provide an example of how to set variables.// handle job subscriptionBuilder.handler((externalTask, externalTaskService) -> { String content = externalTask.getVariable("content"); System.out.println("Sorry, your tweet has been rejected: " + content); Map<String, Object> variables = new HashMap<String, Object>(); variables.put("notficationTimestamp", new Date()); externalTaskService.complete(externalTask, variables); });Release the subscription and start to work asynchronously on the tasks. Add
subscriptionBuilder.open();Save your work in the new project. Open Tasklist and start a new instance of TwitterQA. By restarting the application it should have picked up the changes in the process. In Review tweet be sure to not approve the tweet.
Next, go to Cockpit and check in on the process instance you just created. It should be waiting at Notify user of rejection for an external client to complete it.

Go back to the external client project, and right click on the java class created in Step 4 and select Run As > Java Application. What do you see in the console? Did you see the task being unlocked? The tweet being rejected? You can stop the application by clicking on the Terminate button in the console once you see “Sorry, your tweet has been rejected…”.
Go into Cockpit and view the process instance. You should see that it has completed thanks to an external client.
Congratulations, you’ve created your first external task worker for asynchronous service tasks.
Optional
How would you fail the external task? How would you unlock the task? Hint - use the externalTaskService object. You can simulate random unlocks or failures along with completions using a simple if statement using Math.random() and a threshold between 0 and 1 determining which action to take.