Replace User Task by Business Rules Task
Goal
In this lab you’ll create a Decision Model and Notation (DMN) diagram and create rules to determine whether to approve or reject a submitted tweet based on some data. You’ll then update the Twitter QA process and replace Review tweet user task with a business rule task and use the just created DMN in the business rules task to automate the review of tweets.
Short description
- Create a DMN diagram with rules to decide about approvement and rejection of tweets
- Save the decision diagram in your process application.
- Write a test method to test the decision table.
- Integrate the decision table with a business rule task into your process and test the process under JUnit.
- Restart the process application and run the process in the Tasklist.
Detailed steps
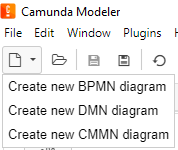
Create a new DMN diagram in the Camunda Modeler. Do this by clicking on the page icon in the upper left corner and selecting Create new DMN diagram as shown below. You can also create a new DMN diagram by navigating to File > New File > DMN Diagram. Rules sets are the building blocks of rule diagrams.
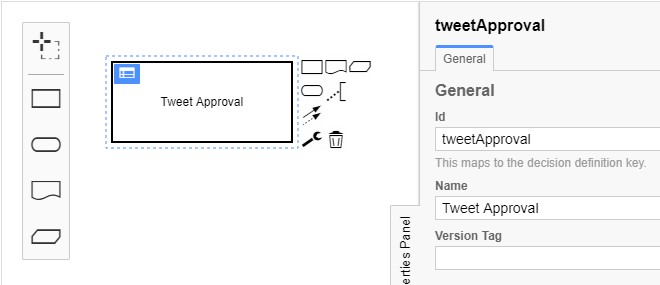
In the opened Decision Requirement Diagram, select the Decision table.
In the property panel, change the Id and Name of the table to something more readable like tweetApproval and Tweet approval.
Select the blue corner of the decision table to enter the decision table and fill it out:
You’ll notice you’re given one input (When) and one output (Then), each of type
string. Double-Click the generated Then column (denoted by a dash) and enter the Label and Output Name a value of approved. You can edit input fields by clicking on them. Change the type fromstringtobooleanas shown below.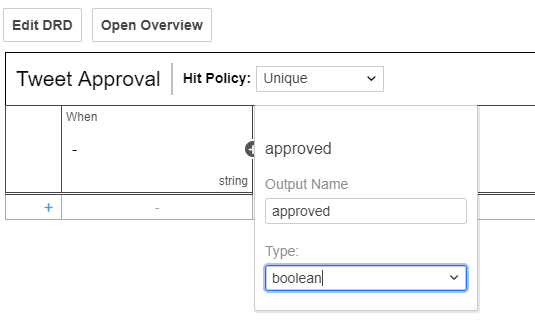
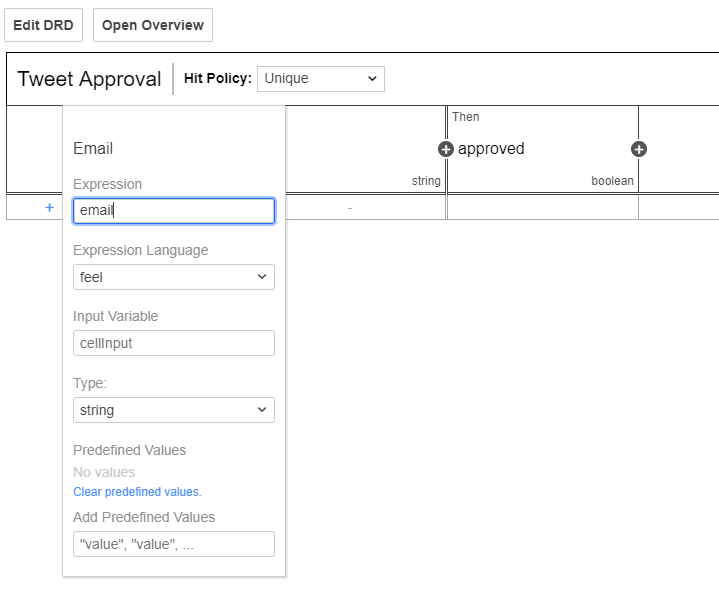
Add another Input by clicking on the gray plus (+) sign next to When. You’ll see the new And column has no name (just a dash) with a type
string.In the When column enter an input label of Email and an Expression of email. You’ll notice you can also fill an Input Variable though we won’t be using it here.
In the And column enter Content for human readable input label and content for Expression. We’ll need to create email and content variables to make this rule set work within the process.
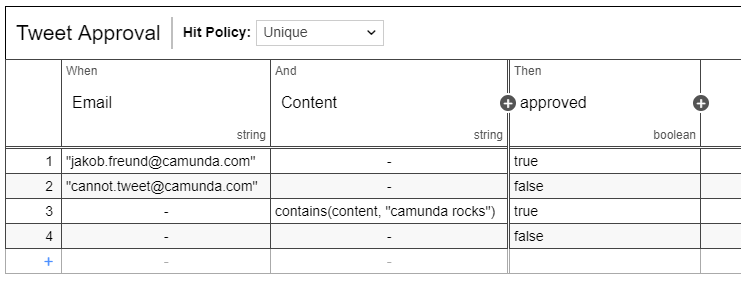
Add some rows with input and output data. Put in an email that will always be approved, like your own and an email that will always be rejected like
cannot.tweet@camunda.org. Put in a row regarding content that will always be approved. Since we need to add some variability to the tweets we need to use a FEEL function approving content. In the cell entercontains(content, "camunda rocks"). Lastly, put in an otherwise row, one that is full of blanks (dashes) to capture anything else and elect to reject it. Your table should look something like this:
 Here is the list of all FEEL functions available.
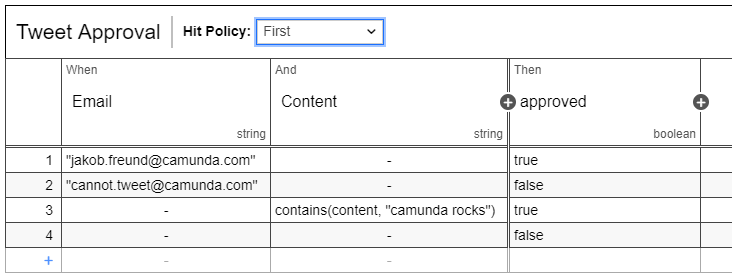
One more thing, we need to set the Hit Policy of the table. By default the Hit Policy is set to Unique as you may have noticed on the head of the table. For this exercise we’ll switch it to First. The rules are evaluated from top to bottom and setting the Hit Policy to First means that the first rule to match will be taken and the rule set completes execution. You can find more information regarding Hit Policies here. Your table should now look like this:
Save the DMN table in
src/main/resourcesof your project in your IDE using a name liketweetApproval.dmn. Make sure the new DMN file appears in your project.Write a JUnit test method to assure that your table works as expected. Create a new test method called
testTweetFromJakoband annotate it with@Testand@Deploymentto deploy the decision table into the engine. The selection may look like this:@Test @Deployment(resources = "tweetApproval.dmn") public void testTweetFromJakob() { }The quickest way to create the input for the decision is to use the camunda-bpm-assert shortcut
withVariables(key, value, nextkey, ...). Make sure to add values for all input columns. Then you can enter the variables directly into thedecisionService()and callevaluateDecisionByKey(). The body of the method can look like this:Map<String, Object> variables = withVariables("email", "jakob.freund@camunda.com", "content", "this should be published"); DmnDecisionTableResult decisionResult = decisionService().evaluateDecisionTableByKey("tweetApproval", variables);Now you can assert on the result. The return type is a wrapper around a list, so you can access the the first element to get your result. The assertion can look like
assertThat(decisionResult.getFirstResult()).contains(entry("approved", true));Did you get the green bar running the test?
When you run the complete Test class, the test coverage will complain that the coverage can only be calculated when all tests deploy the same BPMN resources. To do this, you can add the BPMN file to the deployment providing a String array with both resources:
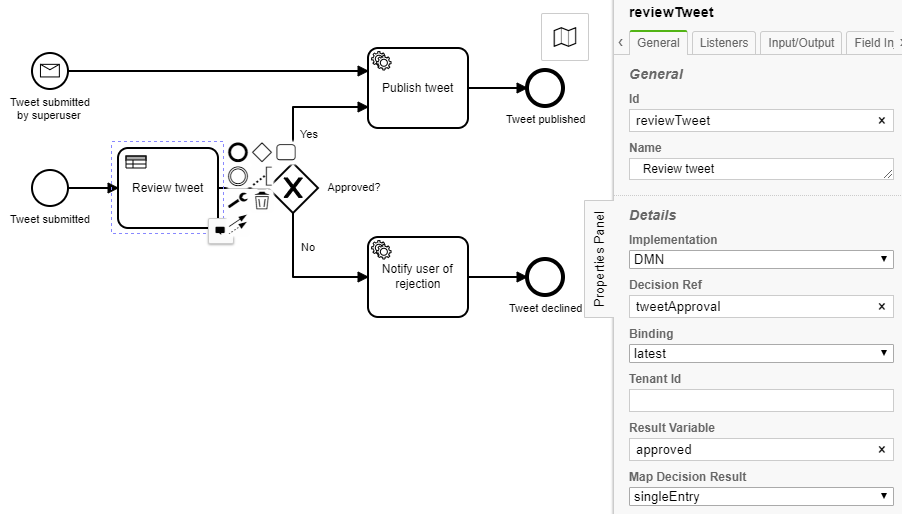
@Deployment(resources = {"tweetApproval.dmn", "TwitterQA.bpmn"})Update your Twitter QA process, changing Review tweet from a User Task to a Business Rule Task. You can also remove the Tweet withdrawn boundary event and Tweet withdrawn end node as well. Be sure to set Implementation of the Business Rule Task to DMN, use the rule reference of tweetApproval (or whatever you used), set the Result Variable to approved, and Map Decision Result, to singleEntry since we’re only bring back one result of a simple type (in this case boolean). Your updated process should look something like this:
Run the JUnit test again. The testHappyPath will fail and will need some corrections for the changed process.
- The test complains that no decision definition is deployed. Add the DMN file to the resources as you’ve done it for the testTweetFromJakob method.
- The expression
${email}can not be evaluated. Add the variable to the map at the start of the process instance. - The result of the task query contains 0 elements. As you’ve changed the user task into a business rule task, you can remove the task query, its assertions and the completion of the user task.
- When the testHappyPath completes successfully, disable the testTweetWithdrawn method. Comment the
@Testannotation, and JUnit will ignore this method. - Do your tests run successfully?
Edit the start-form.html and add a new input for the email.
Restart the spring-boot application and start a new process instance from the Tasklist. Does the process work as expected?