BPMN Event Handling (REST)
Goal
Model a process with message events and run it.
Short description for advanced REST users
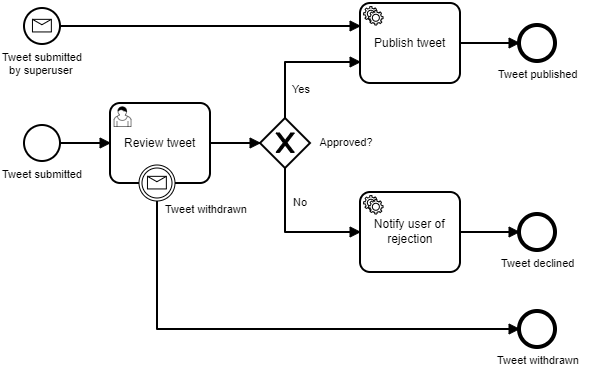
- Update the Tweet QA process to include a message start event by a superuser and a Tweet withdrawn message boundary event in the Camunda Modeler.
- Start Spring Boot application.
- Use your REST client to communicate with the process engine and start a process via Superuser Tweet message.
- Try to get a
MismatchingMessageCorrelationExceptionwith a single process instance. - Use your REST client to communicate with the process engine and start a process manually to ensure it reaches the Review tweet task.
- Send a tweet withdrawn event to complete the process.
Detailed steps for advanced REST users
- Update the Tweet QA process as shown below. If you’ve already updated this process by completing the Java section, skip to Step 4. Add a message start event for a Tweet submitted by a superuser which does not need an approval. Add an message boundary event to Review tweet and connect it to an end event. This will allow a user (or anybody else) to withdraw or cancel a tweet submission.
- For the Tweet submitted by superuser start event add the Message Name
superuserTweet. Message names can be added in the Details section of the General tab of the Properties Panel after you click on the plus (+) sign in Message. You can edit the Message Name which then will be added the drop down selection of messages.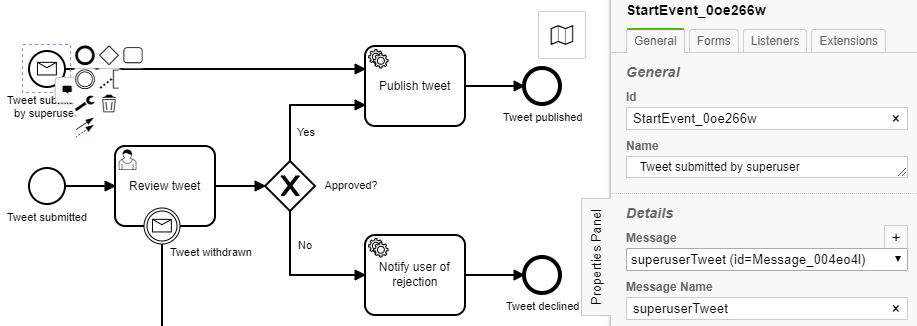
- Repeat for Tweet withdrawn boundary event using a message name of
tweetWithdrawn. Save your updates. - Start your Camunda Spring Boot application as you have done before. See Step 7 of Exercise 2a in case you need a refresher.
- Open your favorite REST client (see Exercise 10 if you don’t have one already) and use the following base url for your next REST API calls:
http://localhost:8080/engine-rest Send a
superuserTweetmessage via a POST REST API to start an instance of TwitterQA. Camunda Docs Reference to POST a message. Be sure to include messageName of the message name you’d like to send along with resultEnabled set to true in the Body to be sure you get back the process instance id of the process you just started for correlation later. You could also use businessKey as a way to correlate messages. Your POST should look something like this (Postman screen shot). Be sure to use aContent-Typeofapplication/jsonin theHeader.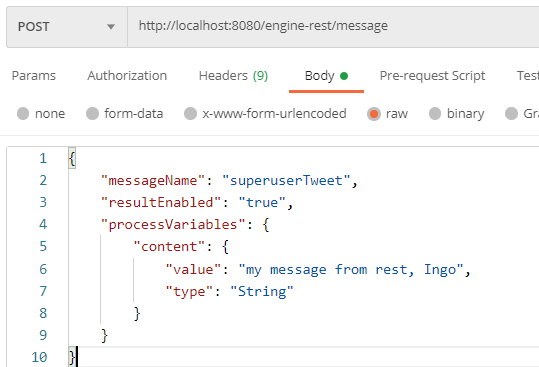
{
  "messageName": "superuserTweet",
  "resultEnabled": "true",
  "processVariables" : {
    "content" : {"value" : "my message from rest, YOUR NAME HERE", "type": "String"}
  }
}
The response should look something like this. Be sure to copy the id for later REST API calls.
 [
    {
        "resultType": "ProcessDefinition",
        "execution": null,
        "processInstance": {
            "links": [],
            "id": "bbe1ddf1-6533-11e9-8b80-00155db2b504",
            "definitionId": "Process_0bh5p3y:1:aa9c0004-652b-11e9-a73c-00155db2b504",
            "businessKey": null,
            "caseInstanceId": null,
            "ended": false,
            "suspended": false,
            "tenantId": null
        }
    }
  ]
Take a look either in Cockpit to ensure a process has been started via REST.
Start a new process instance in the Tasklist.
Send a task query with the REST client as a GET request. Have a look at the docs for the query parameters. Did you find the task? Copy the id from the response.
Stop your external task worker from Exercise 9 if it is still running.
Complete the task with a POST request from the REST client and reject the tweet. Don’t forget to set the Content-Type in the Header to
application/json. Paste the id of the task in the request URL. The payload may look like this{"variables": {"approved": {"value": false}}}What status code did you get for the request? Check it with the docs for the expected result.
Now try sending a
tweetWithdrawnwith the REST client. Your POST should look something like this (Postman screen shot). You should get aMismatchingMessageCorrelationExceptionwhen you attempt to send the message. This means it found a correlation but no waiting tweetWithdrawn event. Response body:
 {
    "type": "RestException",
    "message": "org.camunda.bpm.engine.MismatchingMessageCorrelationException: Cannot correlate message 'withdrawTweet': No process definition or execution matches the parameters"
 }
Use your REST API client to issue a GET at
http://localhost:8080/engine-rest/external-taskto return all of the awaiting jobs. There should only be one job. Here is a sample response:[ { "activityId": "Task_17cys7b", "activityInstanceId": "Task_17cys7b:11458f5a-728c-11e9-9c44-00155db2b504", "errorMessage": null, "errorDetails": null, "executionId": "11456849-728c-11e9-9c44-00155db2b504", "id": "1145dd7b-728c-11e9-9c44-00155db2b504", "lockExpirationTime": null, "processDefinitionId": "TwitterQAProcess:9:379764e0-728b-11e9-9c44-00155db2b504", "processDefinitionKey": "TwitterQAProcess", "processInstanceId": "11403825-728c-11e9-9c44-00155db2b504", "retries": null, "suspended": false, "workerId": null, "topicName": "notification", "tenantId": null, "priority": 0, "businessKey": null } ]Now use your REST API client to issue a POST at
http://localhost:8080/engine-rest/external-task/fetchAndLockto fetch and lock the external task. Be sure to include this in theBody. You’ll use the sameworkerIdto complete the task next. It looks for jobs under thepublishtopic and locks it for 5 minutes.{ "workerId": "exercise11", "maxTasks": 1, "topics": [{ "topicName": "notification", "lockDuration": 300000 }] }You should get a response like this. Copy the id from the response for use in the next REST API call.
 [
    {
        "activityId": "Task_17cys7b",
        "activityInstanceId": "Task_17cys7b:11458f5a-728c-11e9-9c44-00155db2b504",
        "errorMessage": null,
        "errorDetails": null,
        "executionId": "11456849-728c-11e9-9c44-00155db2b504",
        "id": "1145dd7b-728c-11e9-9c44-00155db2b504",
        "lockExpirationTime": "2019-05-11T00:56:09.641-0400",
        "processDefinitionId": "TwitterQAProcess:9:379764e0-728b-11e9-9c44-00155db2b504",
        "processDefinitionKey": "TwitterQAProcess",
        "processInstanceId": "11403825-728c-11e9-9c44-00155db2b504",
        "retries": null,
        "suspended": false,
        "workerId": "exercise11",
        "topicName": "notification",
        "tenantId": null,
        "variables": {},
        "priority": 0,
        "businessKey": null
    }
 ]
Now use your REST API client to issue a POST at
http://localhost:8080/engine-rest/external-task/{id}/complete/. Be sure to include aContent-typeofapplication/jsonin theHeader. Be sure to includeworkerIdin the requestBodyin the call:{ "workerId": "exercise11" }Did the process complete?
Now let’s start another instance using REST, this time making sure it goes to the Review tweet task where we’ll then send a tweetWithdrawn message to demonstrate interrupting boundary event behavior. In your REST API client issue a POST at
http://localhost:8080/engine-rest/process-definition/key/TwitterQAProcess/start. Add a content that can be used to correlate with the withdraw message later on. It can look loke this:{"variables": {"content": {"value": "will be withdrawn later", "type": "String"}}}You should get a response like this.
 {
	"links": [
    	{
        	"method": "GET",
        	"href": "http://localhost:8080/engine-rest/process-instance/924afee2-7296-11e9-9c44-00155db2b504",
        	"rel": "self"
    	}
	],
    "id": "924afee2-7296-11e9-9c44-00155db2b504",
    "definitionId": "TwitterQA:9:379764e0-728b-11e9-9c44-00155db2b504",
    "businessKey": null,
    "caseInstanceId": null,
    "ended": false,
    "suspended": false,
    "tenantId": null
 }
Check Cockpit or Tasklist to confirm a new instance has started as it waiting at Review tweet.
Issue a POST at
http://localhost:8080/engine-rest/messageusing the following in your requestBody. Be sure to use the content as correlation keys.{ "messageName": "tweetWithdrawn", "correlationKeys": {"content": {"value": "will be withdrawn later", "type": "String"}} }
Did the process complete? Congratulations, now you’ve sent messages and tested processes using REST.