Camunda Transaction Handling
Goal
To understand how Camunda handles transactions and how you can control where in the process it rolls back to in the event a service is down, preventing the progress of a process.
Short description
- Add an if-statement that throws a runtime exception on a special content value like
Network error. - Get the error message when you complete the Approve-tweet task with the
Network errorcontent. - Mark the Publish-on-twitter task as async.
- Adjust the JUnit test to handle the additional wait state.
- Redeploy and run a new process instance with
Network errorcontent. - Find the incident in the cockpit.
- Change the value of the content variable and resolve the incident.
Detailed Steps
Add an if-statement to the
CreateTweetDelegate:if (content.equals("Network error")) { throw new RuntimeException("simulated network error"); }Start a new Twitter QA process instance in Tasklist with the content
Network errorand approve the tweet.What happened? Did you get an error message in Tasklist? Have a look in the console of your IDE as well. This error obviously occurred as a result of not being able to publish the tweet. But do we want to show an error to end users or do we want to handle error in a more elegant fashion? Since the Review tweet task is a User Task it is a natural ‘wait state’ or ‘synchronization point’, a point in the process where the state of a process instance needs to wait for something (in this case a person) to complete it, the Camunda Platform engine will save the state of the process instance to the database rather than holding it in memory. If something fails after the process is resumed, in this case a manager completing the Review tweet task, the engine will return to the last known save point which in this case is the Review tweet task. Since Review tweet is a User Task the error message created when Publish tweet failed will be sent back to the user in the form of a message in Tasklist. What’s more, the manager will need to re-submit the form once the service is available. But the problem isn’t with the end user but rather the service itself. What if there was a way to define ‘wait states’ or ‘synchronization points’ to allow you decide where a process rolls back to in the event of a failure? Read on for the answer.
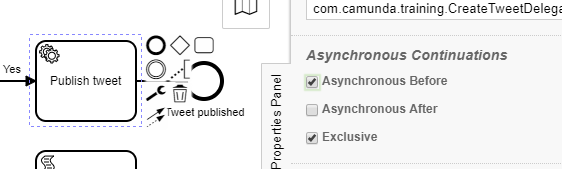
In Modeler in the General tab of the Properties Panel of the Publish tweet task enable Asynchronous Before by clicking on the checkbox in the Asynchronous Continuations section. What this does is it creates a save point before executing the service. In the event of a service failure the process will return to the point just before Publish tweet execution rather than to the previous save point, Review tweet. How do we then handle the error if we can’t re-submit the Review tweet form? Read on to find out.
Be sure to save the updated process. Then restart your application in your IDE to deploy this latest version of the process.
Start a new instance of Twitter QA, again with content
Network errorand approve the tweet. What happened? Did you see an error message in Tasklist? Check the console in your IDE. So, there was a message in the console but not in Tasklist. This is because the process has rolled back to the save point that was specified in Step 4.Open Cockpit either from Tasklist (Click on the Home icon in the far upper right corner and select Cockpit) or open a new browser window and go here.
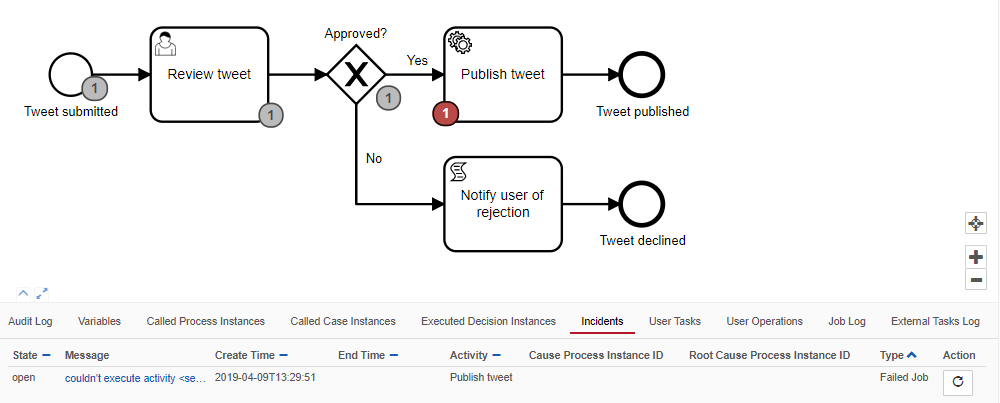
In the Dashboard that appears click on Processes near the upper left hand side. This will display the deployed process definitions. You should see the Twitter QA process along with a red X on the left to indicate there is an incident that occurred which needs to be attended to. Click on the red X to display process instances where an incident has occurred. You should see at least one instance where an incident has occurred.
Click on the Process Instance ID hyper link (it’ll be on the left left side). You should be brought to a screen that displays information about this particular process instance (see screen capture below). You should see the process instance diagram with a red token at the task where the incident occurred. If you click on the Incidents tab under the diagram you should see the details of the incident. You can get stack trace details by clicking on the Message hyper link.
Change the value of the content variable to something different than
Network error.To retry the task click on the circular arrow icon under Action in the Incidents tab. It should be on the right hand side (see screen shot above). This will allow you to increase the number of retries. You’ll see a dialog box asking if you’re sure you want to do this. Click on Retry. What happened? You may need to refresh the page. Do you see the red exclamation token on the task that was retried? Do you see the instance completing? Be sure to check Twitter as well. By putting an Asynchronous Before on Publish Tweet end users are shielded from receiving cryptic error messages. Fixing those is up to administrators or power users.
You’ll need to update your testing code to complete asynchronous save points in the process and move the process forward. Insert the following code snippet after Review tweet task completion and before the process ended assertion in your test code. This will query for jobs that are waiting to be executed and execute them.
    List<Job> jobList = jobQuery()
        .processInstanceId(processInstance.getId())
        .list();
    assertThat(jobList).hasSize(1);
    Job job = jobList.get(0);
    execute(job);
Execute the job in the JUnit test. Did it work?
Optional
- Install the transaction boundary plugin in your modeler and inspect the wait states.
- Migrate the failed process instance to latest version and complete it.